Thursday 31 May 2012

Some of my learners work this week

This week, we've been finishing off work we didn't complete before, because we went outdoor painting to take advantage of the weather.

This is a lovely wash by Mel, Thursday watercolour.
It's not completed yet, but I think the wash to the left of the picture was beautiful in it's freshness, and wasn't too mixed on the surface of the paper, therefore retaining some of its intensity, whilst bleeding quite freely with other colours to create further neutrals.
The object of this exercise was to represent selected areas of high and low, to no, definition, which has been beautifully achieved here.
This one below is from Phil, Thursday watercolour, and was an easter challenge I set a few learners, to depict a large area of complexity, unified by a first single wash.
We all felt Phil shouldn't do too much more to the background which was beautifully suggestive of a hot hazy day with some definition of rooftops kept white with masking fluid.
Phils next challenge was to put foreground detail in, whilst keeping an eye on the overall picture balance in terms of tonal and colour value.
I feel he has achieved this beautifully with his foreground trees and rocks........can't wait to see it finished!

Louise did this estuary in the mist painting entirely wet in wet, which takes some doing, and she has managed this with skill avoiding unintended brushmarks.
Another one from Mel, this is the result of our trip to the botanical gardens, I really love the  colours Mel has used in the background to compliment her Iris's, these undefined colours are suggestive of other flowers, real or contrived, to give a sense of the garden along with the flowers  she was painting, which are themselves not overworked, retain their velvety texture, and combine variation on purple.
There were other pieces of work I wanted to include in this section, but i could kick myself for not taking my camera to class.
More on other learners work at a later date. : )

Friday 25 May 2012

Thursday evening drawing and watercolour class

It was such a beautiful warm sunny day painting with my thursday morning class at the botanical gardens, and the evening was lovely and warm too, so I took my thursday evening class out of the college, and into Linton village to do some direct observation drawing and painting.


We sat at the entrance of the churchyard and decided to draw the tudor house, which involved establishing 2 points of perspective converging on 2 vanishing points beyond each end of the front and side gable


Once we had created a basic structure of correct diagonals to vanishing points, and measured the proportions, the fun bit could commence, by putting in all the lovely details in, with the sure knowledge  that it would look accurate no matter how rickety the house or details were.
 We were able to stay till 9.30 p.m. as the light lasted this long, and start a little of the first washes, photographs were then taken to email to learners so they could finish them at home if they didn't wish to return to the subject in person.


Thursday 24 May 2012

My drawing class

This week my drawing class went to the American war memorial, which is a very moving and beautiful place to be, and it is also an excellent place for studying 1 point perspective.
We have studied 1 point perspective in class before, but it's worth putting it into practice on location


I gave my learners 2 bamboo sticks to locate the vanishing point on the memorial building at the end of the canal


 When we had established where it was, we drew the building at the top of our page, dotted in the V P,  then we measured the proportions of the canal and pathways both horizontally and vertically in relation to the building, and then radiated lines out from the vanishing point to create the edges of the canal and pathways.
After that we blocked in the tonal values, which we measured in relation to the white of our paper==i.e. that which was not absolute white in the scene must be toned down, as opposed to representing lighter areas of the canal for example, by leaving it white, whereas in comparison to the sky, it was actually a mid tone.
A handout of a project studied earlier in class as a reminder of the principle of 1 point perspective.


Gilly Marklew watercolour artist and tutor: This is a short film of stills of my painting in p...

Gilly Marklew watercolour artist and tutor: This is a short film of stills of my painting in p...: This is a short film of stills of my painting in progress, but I'll post each still in due course explaining each wash.

Gilly Marklew watercolour artist and tutor: Dear Learner, As promised and to answer a learner ...

Gilly Marklew watercolour artist and tutor: Dear Learner, As promised and to answer a learner ...: Dear Learner,  As promised and to answer a learner request, I am posting the steps of this painting with descriptions of each stage, howe...

Gilly Marklew watercolour artist and tutor: A recent class

Gilly Marklew watercolour artist and tutor: A recent class: A recent class  The object of  this exercise in class was how to perceive and represent hard and soft edges, defined and undefined ed...

Gilly Marklew watercolour artist and tutor: Recent class

Gilly Marklew watercolour artist and tutor: Recent class: This class was set up to look at the comparison between tone in shadows within local tonal values, and in relation to the whole. ...

Gilly Marklew watercolour artist and tutor:

Gilly Marklew watercolour artist and tutor:
This is a first attempt at filming a demo, which ...
: This is a first attempt at filming a demo, which is very amateurish but I hope to improve bye and bye, the film was made on my stills cam...
This week both my daytime watercolour classes went to the Botanical gardens in Cambridge.
We found a spot not too public, with some beautiful irises


I asked my learners to look at the level of detail they wanted to achieve, in order to work out how long they wanted to stay painting


This was a quick demonstration to illustrate areas of high and low definition, intense to neutral, mixed on paper vs unmixed.


This was a demonstration of an underpainting with small hard and soft edged washes added for definition, after the first unifying wash was in place, in order to establish the tonal and colour values of the whole painting, before embarking on any detail.


We enjoyed our lunch in the warm sunshine very much afterwards!


Monday 21 May 2012

Gilly Marklew watercolour artist and tutor: a recent watercolour painting trip outdoors

Gilly Marklew watercolour artist and tutor: a recent watercolour painting trip outdoors: Last week I took my wednesday, and thursday Comberton watercolour classes out on location, firstly to Wimpole hall estate, and then to the ...

Gilly Marklew watercolour artist and tutor: Recent drawing class

Gilly Marklew watercolour artist and tutor: Recent drawing class: This exercise was designed for my drawing class to gauge relative tonal values. The primary object was to represent individual local to...

Recent class

This class was set up to look at the comparison between tone in shadows within local tonal values, and in relation to the whole.


Sunday 20 May 2012

a recent watercolour painting trip outdoors

Last week I took my wednesday, and thursday Comberton watercolour classes out on location, firstly to Wimpole hall estate, and then to the view over Wimpole from a hill in Eversdon.
We focused mainly in the trees, and practised our dry brushstroke technique for the fine twigs and branches, and also, for the sparse spring foliage.

Dry brushstroke is achieved by holding your paintbrush so it is almost horizontal to the papers surface, and using the whole width of the brush, tickle the the paper lightly, skimming the surface texture of the paper, and don't over do it or it will all fill in, also, if it is still filling in, it's likely that you either have too much water on your brush, or you are holding the brush at too steep an angle.

To make the dry brushstroke look effective to represent the outer twigs of a tree, pull the length of the brush to the center of the tree from the outside edge, so it looks like it's radiating out from the main arterial branches.
And paint  the branches in last if the tree is in foliage, leaving gaps in the branches where they are obscured by the foliage, if you don't, it will look like the tree is in front of it's foliage.


Painting outdoors can take as long as you like, from rough sketches to something more finished, this may depend on how comfortable you are, if you're not used to it, start by painting near your car or house, so you won't be stuck in the middle of nowhere freezing cold or having to lumber too much equipment around with you.
I also find it's useful to take my camera with me everywhere, either to give myself the option of completing a painting back in my studio, or to store interesting scenes in my photo reference file.

I could kick myself sometimes for not having a camera with me when an interesting scene captures my eye.


Recent drawing class

This exercise was designed for my drawing class to gauge relative tonal values.

The primary object was to represent individual local tonal values in relation to the whole, and to identify and represent areas of high and low contrast, and again, lost and found edges.

Also to identify and comprehend value masses, which are areas of the composition which merge together due to their similarity of tone, regardless of how many separate objects are within a value mass.

To appreciate this, squint at the image below, and see the brown jug merge with the background tone, and similarly the brown cup and the green jar, see if you can find any more?
The importance of this is the usefulness of pulling the viewers eye to and from different areas of the composition to keep the eye interested in the composition as a whole, and not to get stuck in 1 particular place.


The week before that, we visited the museum of classical archaeology in Cambridge, to draw facial features from direct observation, as we had been practising from handouts the week before that.
We also had a very nice time in  the museum cafe afterwards! : )


Saturday 19 May 2012

A recent class


A recent class 

The object of  this exercise in class was how to perceive and represent hard and soft edges, defined and undefined edges, or as the art world likes to describe it, lost and found.
I absolutely love the portrait below, ( not mine ) and as my learners hadn't done figure drawing for a while I thought I'd like to set a similar situation up in class, with a checkered background of dark against light, with a strong spotlight at the side to cast shadows into the dark clothes and hat, partly for compositional structure, but also to  challenge my learners to see defined and undefined edges.

We practiced painting hard and soft edges first by painting a clear wash from from the center to the edge of the page, and placing various pigments near the dry edge to create some definition wet in wet, and  by controlling  the amount of water to pigment ratio on our brushes.
See test pieces for high and low definition within a wash with surface water consistency


in the test piece below right was to demonstrate how to get high definition by using less water, more pigment on a water consistent surface, after applying a low definition wash with a more water to pigment ratio.
The blotch top left of this piece was to demonstrate what happens when there is more water on your brush than there is on the paper, this usually happens by fiddling too much for too long as the wash is drying, and not checking the pigment to water ratio on the brush.


Below Right is a quick demonstration of hard and soft edge, within the context of this painting.
This type of wash, could be complete in itself, ( with a little more care than I have demonstrated here! )
Or as the first wash as an underpainting.

Thursday 17 May 2012

Dear Learner, 
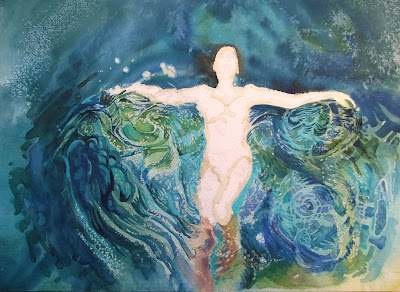
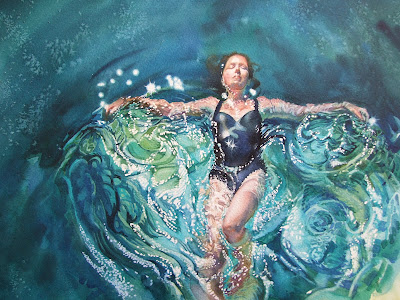
As promised and to answer a learner request, I am posting the steps of this painting with descriptions of each stage, however, as I made this sequence of photo's before I started up this blog, I have not included the first stages of sketches, but will aim to do so in future.


The painting started out as a staged photo, that is to say I had my photo taken with a series of poses I had previously thought through in the situation I had planned. I would have loved to have used a model for this, but sadly there are rarely any available in the rare moments I get chance to be near an open air pool, so reluctantly I have to use myself.
I decided to  crop the painting in to include the dark value mass of the shadows to the left and above, as I wanted a strong abstract structure to work within.
Then I drew the painting in by eye onto tracing paper, from the photo on my computer screen, including all the ripples!!
In previous paintings I have traced the complexities out from photocopies, or from fixing tracing paper directly on to the monitor screen, however neither were possible for technical reasons in this case, so I had to resort to drawing! which I'm told I should do more of ; )  ( watch this space! ).

When I had the drawing I was happy enough with, I turned the tracing paper over and covered the back with charcoal, and lightly dusted it with tissue, turned it back over and Fixed it to my ready stretched watercolour paper, and began tracing down all lines I have already drawn, this is no more tedious to me than  knitting is to some, I'm perfectly happy to listen to radio 4 doing this.
Then I identify the areas I want to remain white, and apply masking fluid to them, this is also a radio 4 moment : )
Now comes the scary bit : 0 The first wash, this is the wash you see below, as you can see there is quite a lot going on in it, but if you aren't confident doing so much on the first wash, keep it simple, concentrate on surface water consistency, and leave it to dry! This is the obstacle many of my learners stumble over, by trying to produce a completed painting in the first wash, fiddling about in one part of the wash whilst another part is drying, panicking, and trying to amend it by fiddling  some more, resulting in brush-marks, blooms, blotches and back-runs.
You can add more later or correct, by painting over a dry wash.
The key to surface water consistency, is to start extremely wet, going over it once more after you've applied a clear wash to make sure it's consistent, and then matching the pigment to water ratio on your brush, in relation to the amount of water on the surface of the paper, this means your brush should be drying in line with the drying paper.
If you need more time to add more pigment, or you can see it drying inconsistently, spray it with water from a fine mist sprayer from a distance to get an even coverage.
I'm going to stop here as I only have a few hours left to do my latest painting before teaching tonight.
Any queries, let me know.
Gilly.


This, the 2nd wash was the start of adding layers to the water on the bottom left, it's really a case of identifying the shapes the ripples make and filling them in wet on dry.
You may notice salt resist speckling at the top but I later obliterated this because I wanted to darken it down


 Here, after most the ripples were in place I removed the masking fluid from the water highlights
 on this one below I refined the highlight sparkles and added darker wet on dry to the ripples to give them more depth of tone, then I added the skin tones and colour, see top right arm for 1st wash on the skin, when this was dry I added more wet on dry ripples to the skin in the same way I did it for the water,
I also darkened the value mass at the top, as I felt it needed simplifying after the details had been put in place by the ripples, I wanter a selective focal point.
Also, once the swimming costume was in place, I felt it was standing out too much, and needed framing by the background
 here I painted the face in, and added more hair wet in wet to the background water, by masking out the face with a bit of face shaped paper, and spraying the area around the head with my fine mist diffuser before  dropping dark brown pigment for the hair.