Dear Learner,
As promised and to answer a learner request, I am posting the steps of this painting with descriptions of each stage, however, as I made this sequence of photo's before I started up this blog, I have not included the first stages of sketches, but will aim to do so in future.
The painting started out as a staged photo, that is to say I had my photo taken with a series of poses I had previously thought through in the situation I had planned. I would have loved to have used a model for this, but sadly there are rarely any available in the rare moments I get chance to be near an open air pool, so reluctantly I have to use myself.
I decided to crop the painting in to include the dark value mass of the shadows to the left and above, as I wanted a strong abstract structure to work within.
Then I drew the painting in by eye onto tracing paper, from the photo on my computer screen, including all the ripples!!
In previous paintings I have traced the complexities out from photocopies, or from fixing tracing paper directly on to the monitor screen, however neither were possible for technical reasons in this case, so I had to resort to drawing! which I'm told I should do more of ; ) ( watch this space! ).
When I had the drawing I was happy enough with, I turned the tracing paper over and covered the back with charcoal, and lightly dusted it with tissue, turned it back over and Fixed it to my ready stretched watercolour paper, and began tracing down all lines I have already drawn, this is no more tedious to me than knitting is to some, I'm perfectly happy to listen to radio 4 doing this.
Then I identify the areas I want to remain white, and apply masking fluid to them, this is also a radio 4 moment : )
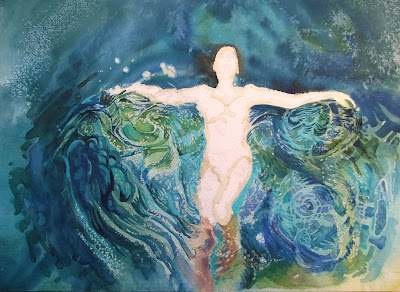
Now comes the scary bit : 0 The first wash, this is the wash you see below, as you can see there is quite a lot going on in it, but if you aren't confident doing so much on the first wash, keep it simple, concentrate on surface water consistency, and leave it to dry! This is the obstacle many of my learners stumble over, by trying to produce a completed painting in the first wash, fiddling about in one part of the wash whilst another part is drying, panicking, and trying to amend it by fiddling some more, resulting in brush-marks, blooms, blotches and back-runs.
You can add more later or correct, by painting over a dry wash.
The key to surface water consistency, is to start extremely wet, going over it once more after you've applied a clear wash to make sure it's consistent, and then matching the pigment to water ratio on your brush, in relation to the amount of water on the surface of the paper, this means your brush should be drying in line with the drying paper.
If you need more time to add more pigment, or you can see it drying inconsistently, spray it with water from a fine mist sprayer from a distance to get an even coverage.
I'm going to stop here as I only have a few hours left to do my latest painting before teaching tonight.
Any queries, let me know.
Gilly.
This, the 2nd wash was the start of adding layers to the water on the bottom left, it's really a case of identifying the shapes the ripples make and filling them in wet on dry.
You may notice salt resist speckling at the top but I later obliterated this because I wanted to darken it down
Here, after most the ripples were in place I removed the masking fluid from the water highlights
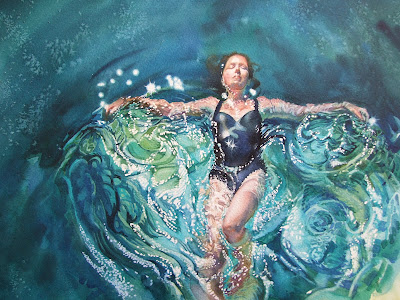
on this one below I refined the highlight sparkles and added darker wet on dry to the ripples to give them more depth of tone, then I added the skin tones and colour, see top right arm for 1st wash on the skin, when this was dry I added more wet on dry ripples to the skin in the same way I did it for the water,
I also darkened the value mass at the top, as I felt it needed simplifying after the details had been put in place by the ripples, I wanter a selective focal point.
Also, once the swimming costume was in place, I felt it was standing out too much, and needed framing by the background
here I painted the face in, and added more hair wet in wet to the background water, by masking out the face with a bit of face shaped paper, and spraying the area around the head with my fine mist diffuser before dropping dark brown pigment for the hair.


No comments:
Post a Comment