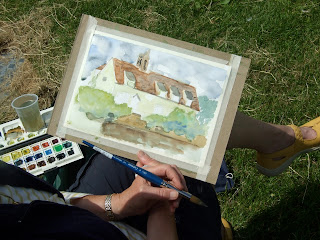
Both the drawing and wednesday watercolour classes were out-doors this week due to the nice weather, we measured angles and proportions.
The drawing class at Impington drew st Andrews church, where we meet.
We first drew the vanishing points of the church inside from photocopies, then found them again on an image projected against the wall with the aid of bamboo sticks, then we went outside to draw the church, measuring the angles of the extreme top and bottom parts of the church to find the vanishing points in the church yard, then measuring the proportions of each section in relation to the whole.
The church was a rather complicated building to study, if the weather is good enough next week, we will draw the simpler church meeting room.
I took my Wednesday watercolour class to paint outdoors on Comberton village green
We met in class and measured the angles of these boxes I put together with colours indicating top and side,
we used bamboo sticks to illustrate how the lines on the edges of the box, which appear to be parallel when viewed from straight on, converge when viewed at an angle.
Then we drew the angles of the boxes by holding a ruler or pencil between our eye and the boxes to gauge the angle of the boxes, then we transferred this angle to our paper, we did not look for the vanishing point, as this would have made the drawing very small.
I will repeat this exercise for my drawing class as I think it would have helped.
We used rulers and pencils to gauge the angles of the house in the same way we did with the boxes in class.
Then we roughly and very lightly, sketched out the house from chimney to pond to contain all we wanted to draw, and then we checked our angles as above, and corrected the light lines we had already put down.
We also held a ruler or pencil as vertically as possible to check the negative spaces in order to see the angles better. see below.
then we measured the vertical distance between ridge of the roof to the guttering, and the guttering to the top of pond wall, and the pond wall to the pond, and we discovered these were very similar in scale, so we marked these proportions out and drew them in with the correct angle.
Similar measurements for the horizontal proportions were done in relation to the whole i.e.= the distance between the end of the left gable to where the chimney started, ( unit 1 ) went 3 1/2 times into the length and so on.
I know it seems like a lot of palarvar to begin with, but it becomes automatic after a while and much quicker, also this type of measuring is applied to almost any subject, so if you are doing a portrait for example, it's going to really show if your measurements aren't accurate.
Similarly we measured and compared the colour of our painting by holding up a quick swatch of mixed colour between ourselves and the subject to get the best match, which follows on from last weeks lesson in matching colour and tone from half a photocopy.
Finally we had a group meeting to talk about difficulties, and how to solve them, some L's enjoyed the measuring more than the painting and vice versa.
And to sum up, I added that it is not always necessary to paint exactly what is in front of you, but if you choose to be abstract and interpretive, it is because you want to and not because you don't know how to represent the actual.
I think we should have a progression of building layers up to demonstrate the detail that we all like to do for next week.


No comments:
Post a Comment